
Planning a naked cake wedding is more than just choosing a dessert it’s about making a style statement that’s natural, rustic, and deliciously elegant. Whether you’re dreaming of a boho barn ceremony or a chic garden reception, the naked cake wedding has become the go-to choice for couples who want to keep it simple yet stunning. This guide dives deep into everything you need to know from decorating tips and flavor combos to pricing, display ideas, and inspiration from real weddings.
Looking for inspiration? Try this take on a rustic celebration with floral-topped layers: Check out naked wedding cake design
Why Naked Cake Wedding Designs Are Trending
The Rise of Rustic and Minimalist Weddings
In the last decade, the wedding world has shifted from extravagant fondant towers to a cleaner, more honest presentation enter the naked cake wedding. Brides and grooms across the US are ditching over-decorated desserts for rustic naked cake wedding options that align perfectly with natural, farm-style, or outdoor ceremonies. This movement reflects a broader trend in modern weddings: authenticity.
Minimalism is more than a visual choice it’s a mood. Couples want their day to reflect who they are, and what better way than to display a cake that shows off every luscious layer and creamy filling? The naked cake wedding fits right into the current obsession with organic materials, neutral tones, and effortless beauty.
Naked cake weddings are especially popular in:
- Farm and barn venues
- Backyard weddings
- Beach ceremonies
- Vineyard and garden receptions
What Makes a Naked Wedding Cake Special
Unlike traditional cakes that hide behind fondant and intricate piping, the naked cake wedding lets every ingredient shine. You can see the sponge, fillings, fruit, or floral décor layered in a way that feels honest, beautiful, and yes totally Instagram-worthy.
Here’s what sets a naked cake wedding apart:
| Feature | Traditional Wedding Cake | Naked Cake Wedding |
|---|---|---|
| Icing Style | Fully frosted with fondant or buttercream | Minimal or no frosting on the outside |
| Visual Appeal | Polished, often artificial | Organic, natural, rustic |
| Decor | Sugar flowers, fondant shapes | Fresh fruit, real flowers, herbs |
| Texture | Uniform | Textured, layered look |
The naked cake wedding charm lies in its imperfect perfection. The visible textures, fresh elements, and handcrafted vibe appeal to couples who want something timeless yet on-trend.
Discover great ideas like how to pair blooms and berries for naked cakes here: Flowers on Naked Cake Safe Decorating Guide
Whether you’re working with a local baker or considering a DIY route, the naked cake wedding style gives you endless room for creativity and always guarantees those “wow” moments when it’s finally cut and served.
Different Types of Naked Cake Wedding Styles
Semi-Naked vs Fully Naked Cake wedding
When planning a naked cake wedding, one of the first decisions couples face is choosing between a semi-naked or fully naked cake wedding. Both are stunning, but they offer distinct looks and finishes.
Semi-Naked Cake wedding
A semi-naked cake wedding is lightly coated with buttercream, then scraped down to reveal parts of the cake sponge. It’s perfect for those who want a slightly more polished look while still leaning into the rustic vibe. The thin layer of frosting helps retain moisture ideal for warm venues or outdoor weddings.
Fully Naked Cake wedding
This style skips the outer frosting entirely. Layers of sponge and filling are stacked visibly, creating a raw and organic aesthetic. Fully naked cakes are often paired with bold decorations like dripping caramel, fresh fruit, or florals to create visual interest.
| Feature | Semi-Naked | Fully Naked |
|---|---|---|
| Appearance | Light frosting outside | No outer frosting |
| Texture | Smoother edges | Raw, rustic |
| Moisture | Holds in moisture better | Best made close to the event |
Don’t miss our tips on how to select flower types for any style cake: Top Flowers for Naked Cake Decoration
Floral, Fruit, and Natural Décor Options
The beauty of a naked cake wedding lies in the simplicity but don’t confuse simplicity with plainness. Décor options are endless and can completely transform the cake’s look.
Here are the most popular decoration styles:
Floral Designs
- Use edible flowers like pansies, violets, or roses
- Place blossoms between layers or cascade them down the tiers
- Combine with greenery like eucalyptus or olive branches
Fresh Fruit Accents
- Berries (blueberries, strawberries, raspberries) add color and freshness
- Figs, grapes, or dried orange slices create a more sophisticated tone
- Great for seasonal themes (summer fruits vs. autumn harvests)
Nature-Inspired Touches
- Sprinkle powdered sugar to mimic snow for winter weddings
- Add rosemary sprigs or lavender for a fragrant touch
- Drizzle with honey or caramel for golden highlights
Looking for inspiration? Try this floral-decorated masterpiece: Explore More Naked Cakes
Each of these styling choices lets you align your cake with your wedding theme whether you’re aiming for whimsical, garden-inspired, or earthy and minimalist. With so many combinations, the naked cake wedding becomes not just a dessert, but a central decor element of your reception.
Print
Naked Cake Wedding: The Ultimate Guide to Rustic Elegance for Your Big Day
- Total Time: 2 H
- Yield: 12 1x
Description
Ingredients
Naked Wedding Cake
- 32 ounces all purpose flour
- 32 ounces granulated sugar
- 2 teaspoons salt
- 2 teaspoons baking soda
- 1 teaspoon baking powder
- 6 large eggs room temperature
- 10 ounces vegetable oil
- 20 ounces buttermilk room temperature
- 8 ounces melted unsalted butter (melted, but not hot)
- 4 teaspoons vanilla extract
Easy Vanilla Buttercream
- 48 ounces unsalted butter room temperature. You can use salted butter, but it will affect the taste and you need to leave out additional salt.
- 48 ounces powdered sugar sifted if not from a bag
- 4 teaspoons vanilla extract
- 1 teaspoon salt
- 12 ounces pasteurized egg whites room temperature
- 2 TINY drops purple food coloring (optional) for whiter frosting
Instructions
Making the Naked Wedding Cake Batter
- First, preheat the oven to 335ºF (168ºC).
- Prepare two 8” cake pans with cake goop or another pan release.
- Then, measure out all of your ingredients using a digital kitchen scale. You can mix the wet and dry ingredients separately for a finer texture, or just measure and add directly into the bowl of your stand mixer for fewer dishes.
- In a mixing bowl, combine and mix together the buttermilk, butter, oil, eggs, and vanilla. Your wet ingredients should all be slightly warm. I microwave my buttermilk for about 30 seconds and place my eggs (still in the shell) in a bowl of warm water.
- Next, in the bowl of your stand mixer using a paddle attachment, combine the flour, sugar, salt, baking soda, and baking powder. Let the mixer slowly combine for a few seconds.
- While the mixer is on low, pour the wet ingredients into the dry ingredients.
- Then, turn the mixer up to medium speed and mix until the batter is combined. Scrape the bowl to make sure all of the ingredients are combined.
- Let the batter mix on speed 2 for 1 minute. It should look kind of like pancake batter.
- Divide the batter evenly between the prepared cake pans and place them into the oven on a middle rack.
- Bake the cakes for 40-50 minutes, or until a toothpick inserted in the center comes out clean.
- Finally, allow the cake to cool for 10 minutes and flip out onto a cooling rack. If you plan to frost and decorate the cake on the same day, you can place the cakes into the freezer unwrapped for about an hour or until they are cold (but not frozen). PRO TIP: If you plan to decorate your cake at a later date, then you will wrap the cakes in plastic wrap first before placing them in the freezer.
Easy Buttercream Instructions
- First, place the egg whites and the powdered sugar in a stand mixer bowl. Attach the whisk and combine the ingredients on low, and then whip them on high for 4-5 minutes (until shiny) to dissolve the powdered sugar.
- Then, add in the salt and the vanilla extract. If you are adding in any food coloring, this is the point where you would do that. PRO TIP: Use a toothpick to transfer 1-2 drops of food coloring to your frosting to avoid putting too much color in your buttercream.
- Next, add in your softened butter piece-by-piece, and whip it with the whisk attachment to combine. It will look curdled at first. This is definitely normal. It will also look pretty yellow. Keep whipping.
- If your buttercream looks curdled, remove about 1 cup of buttercream and melt it in the microwave for 10-15 seconds until it is just barely melted. Then, pour it back into the whipping buttercream to bring it all together.
- Optional: Add in 2 drops of purple food coloring to make the buttercream whiter. You can use any food coloring you want, but if you want my recommendation, I use Chef Master gel food coloring. Use code “SUGARGEEKTEN” to get 10% off your order!
- Then, whip it on high with the whisk attachment for 8-10 minutes until the buttercream is white, light, and shiny. Taste test the buttercream. If it tastes like sweet ice cream, then it’s ready!
- Finally, switch to a paddle attachment and mix the buttercream on low speed for up to 15-20 minutes to make the buttercream ultra smooth and remove any air bubbles. Ultimately, this step is optional. But, if you want really creamy frosting, then you don’t want to skip this final step.
Preparing the Naked Wedding Cake Tiers
- First, trim off the dome of your cake layers. Do not trim off the sides of the cake. If you trim off the sides of the cake, then your cake will lose moisture quicker since this is a naked cake and the sides won’t be covered in buttercream.
- Then, trim your cake boards to be a little bit smaller than the width of the cake.
- Apply a small amount of tape to your turntable, and then place your cake board on top. This will keep the cake board from sliding around.
- Next, place your cake on top of the cake board.
- Spread a thin layer of buttercream on top of the cake using an offset spatula. The layer of buttercream should be between ¼″ to ½” thick. When smoothing out the buttercream onto the cake, keep the buttercream as level as possible (i.e. avoid large bumps of buttercream).
- Then, repeat this process with the second cake layer, and then add your final layer of cake on top.
- Spread a very thin layer of buttercream around the sides and top of the cake. This thin layer will seep into the small air bubbles of the cake and help seal in the moisture.
- Next, use a bench scraper to remove the buttercream from the sides of the cake.
- Finally, use a spatula to smooth out the buttercream on top of the cake.
- Then, repeat this process as needed for any additional layers of cake you have left depending on how servings of cake you are making.
- If you need to transfer your cake from your turntable to your cake stand, then use an offset spatula to carefully and gently lift one side of the cake so that you can get your fingers underneath it. Then, you can lift the cake by the cake board to move it to wherever it needs to go like the freezer for storage or moving it onto a cake stand.
Assembling the Naked Wedding Cake
- Download my cake support guide to help get you started!
- Begin with your bottom cake tier in front of you.
- Grab the cake pan you used that is the same size as the smaller cake tier you want to stack on top of your bottom cake tier. Place the smaller cake pan right on top of the bottom tier so that the cake pan is sitting on top of the buttercream.
- Use a spatula to trace along the edge of the cake pan to mark a line. This will show you where you need to place your straws and skewers to support the weight of the next cake tier.
- Place a straw through the top of the bottom tier cake right in the center. After you’ve placed the straw through the cake tier, move your thumb to the spot where the top of the cake ends and then use scissors to trim off the excess straw. You don’t want to see any straw popping out of the top of the cake.
- Then, use the trimmed straw as a guide to cut all of your remaining straws so they are all the same height as the cake tier.
- Next, stick your straws through your cake about ¼″ inward from the line you created using the cake pan in a circle. If you’re unsure how many straws you need, generally, you need 1 straw per inch of cake you’re needing to support (i.e. for a 6” cake, you need 6 straws as supports beneath it to keep the top cake from collapsing).
- Then, after you’ve placed the straws, use a spatula to smooth buttercream over the top to hide the straw holes.
- Now you are ready to place your smaller cake tier on top of the bottom (larger) cake tier.
- Make sure the cake tier is centered, and then insert a skewer through the center of the top cake tier. Place the skewer all of the way inside the cake (it will puncture the cake board and that is okay). Cover the spot where the skewer is with a little bit of buttercream and smooth it out.
- Repeat as needed until all of your cake tiers are stacked onto your cake.
- Place the cake in the refrigerator overnight until you need to deliver the cake to the wedding or event.
Packaging the Wedding Cake for Delivery
- You will need a box that is the same width as the bottom (largest) tier of your cake. For instance, if your bottom cake tier is 10” x 10”, you will use a 10” x 10” width cardboard box.
- First, you trim your box to create a flap on one side. Use an X-acto blade to cut downwards along 2 corners of the box, and then bend that side downward to create a flap where your cake will enter in and out of the box.
- If you have a piece of cardboard on the bottom that is sticking up where your cake is going to be, use a piece of tape to stick it down.
- Next, carefully slide your cake on top of the flap and into the cardboard box.
- If your cake is taller than your cardboard box, then you can move the box flaps upward and use tape to join the flaps with the corners so the box becomes taller.
- Want additional coverage on top? You can cover the exposed top of the box with some plastic wrap to protect the cake. This is especially helpful if it’s a windy day and you’re worried about dust, debris, or rain getting on the cake.
- Now your cake is ready to travel to the venue! When you arrive at the wedding and it’s time to unbox your cake, remove the tape from the box and slide it out and move it to the cake table.
Decorating Your Cake with Fresh Flowers Safely
- Now that you’ve arrived at the wedding venue and it’s time to decorate the cake with flowers, use a small amount of buttercream to fill in any gaps where the cake tiers meet and along the bottom of the cake tier on the cake plate. Smooth out the buttercream you added.
- First, prepare your fresh flowers by trimming them down so that you have about 2”-3” of stem. Remove any of the bad petals that appear bruised.
- Then, wrap all of your flower and plant stems in plastic wrap. This will keep the water from the flower trapped inside of the stem which will not only keep the flowers fresh for longer, but it will protect the cake from being contaminated by the plant.
- Next, insert your flower that is wrapped in plastic wrap into a straw.
- Insert the straw into the cake where you want the flower to sit. If you find yourself hitting the cardboard, take the straw out of the cake and remove the flower from the straw and trim it down and try again.
- Repeat until you have decorated your cake with flowers and plants to your liking.
Notes
Important Things To Note Before You Start:
- Download my straw support cake guide to get started!
- Bake your cakes 2 days before the wedding or event. For instance, if your event is on Saturday, then bake your cakes on Thursday. On Friday, focus on frosting and stacking the cakes. Then, when Saturday comes, all you’ll need to focus on is delivering the cake to its final destination and then adding in any fresh flowers after you arrive at the venue.
- In the long run, a chilled cake is going to transfer much easier than a freshly frosted cake. Ultimately, this is why it’s crucial to take several days to prepare the wedding cake so you can freeze or refrigerate your frosted and stacked cake until it is ready to travel to the event.
- Generally speaking, when you are choosing what flowers to use to decorate your cake, think about how big the cake is. If you don’t have a huge cake, then you don’t want huge flowers. Think about the ratio of how big a flower looks on a cake tier, and use a little bit of greenery in addition to colorful flowers. Ultimately, use the bouquet/boutonniere as your guide to decide what flowers to include and how much. When in doubt, stick with the rule of 3s (three of the same flower, three types of flowers/plants, groups of three grouped together, etc).
- The best investment you can make when you’re getting started with baking is a digital kitchen scale! Weighing your ingredients will help you avoid cake failure. Using a kitchen scale for baking is super easy and gives you the best results every single time.
- Practice Mise en Place (everything in its place). Measure out your ingredients ahead of time and have them ready before you start mixing to reduce the chances of accidentally leaving something out.
- Need more help with making your first cake? Check out my how to decorate your first cake blog post.
- Make sure all of your cold ingredients (e.g. butter, eggs, milk) are at room temperature or a little warm. Why? Because we want to create an emulsion and allow the ingredients to fully mix together.
- Make your own pan release (cake goop!) The best pan release ever!
- If you want to add food coloring to this frosting, then you will add in any food coloring while you are mixing the egg whites with the powdered sugar (before you add in the butter). PRO TIP: Use a toothpick to transfer 1-2 drops of food coloring to your frosting to avoid putting too much color in your buttercream.
- You can use whichever food coloring you have, but if you want a recommendation I would suggest the Chef Master gel food coloring. Use code “SUGARGEEKTEN” to get 10% off your order!
- Prep Time: 20
- Decorating Time: 1 H
- Cook Time: 40
- Category: Dessert
- Method: n/a
- Cuisine: american
Nutrition
- Serving Size: 1
- Calories: 680kcal
- Sugar: 63g
- Sodium: 346mg
- Fat: 37g
- Saturated Fat: 23g
- Unsaturated Fat: 10g
- Trans Fat: 1g
- Carbohydrates: 83g
- Fiber: 1g
- Protein: 5g
- Cholesterol: 124mg
Keywords: Heavy cream, baking soda, baking powder, sugar, fresh Orange blossom water, corn, heavy cream, almond extract, Naked Cake Wedding
Best Flavors for Naked Wedding Cakes
Popular Cake and Filling Combinations
Flavor is where your naked cake wedding truly becomes unforgettable. While the minimalist look is key, what’s inside is just as important because your guests will remember that first bite. Since naked cakes don’t have thick frosting to lock in moisture, the right flavor and texture pairings are essential.
Here are the most crowd-pleasing combos that also hold up beautifully in naked form:
| Cake Flavor | Filling Ideas | Description |
|---|---|---|
| Vanilla Bean | Lemon curd + whipped cream | Light, bright, and classic |
| Chocolate | Salted caramel + espresso buttercream | Rich and bold |
| Red Velvet | Cream cheese + raspberry jam | Slightly tangy, visually striking |
| Almond | Amaretto buttercream + berry compote | Nutty with a sweet contrast |
| Lemon | Blueberry filling + vanilla frosting | Refreshing and summery |
These combinations are perfect for naked wedding cakes because they offer both taste and aesthetic value many fillings add pops of color between layers, enhancing the visual appeal.
Check out how flavors match with design in this featured cake: Discover this Strawberry Shortcake Twist
Seasonal Flavor Inspirations
Seasonal flavors are a smart and stylish way to personalize your naked cake wedding. Not only do they reflect the time of year, but they often use ingredients that are fresher, tastier, and more cost-effective during their peak.
Here’s a quick guide by season:
Spring
- Lemon + lavender
- Carrot cake with orange zest frosting
- Vanilla sponge with elderflower syrup
Summer
- Strawberry + basil
- Coconut + mango
- Key lime + whipped cream
Fall
- Pumpkin spice + maple buttercream
- Apple cider cake + salted caramel
- Brown butter + pear compote
Winter
- Chocolate + peppermint cream
- Gingerbread + cinnamon frosting
- Red velvet + white chocolate ganache
Pair your flavor with matching decorations think citrus slices in summer or sugared cranberries in winter for a cake that looks as good as it tastes.
Want to know which cake is perfect for your season? Try this guide to seasonal cake styles
How to Decorate a Naked Cake for a Wedding
Safe Flowers and Greenery for Decorating
One of the most iconic features of a naked cake wedding is the use of real flowers. They add instant beauty, elegance, and a natural flair but not all flowers are safe for cake décor. That’s why knowing which blooms are edible or food-safe is essential when placing them directly on your cake.
Here’s a list of safe and stunning flowers often used in naked cake wedding decoration:
| Flower | Safe for Cakes? | Best Use |
|---|---|---|
| Roses | Yes (organic, pesticide-free) | Classic romantic styling |
| Pansies | Yes (edible) | Whimsical, colorful accents |
| Lavender | Yes | Rustic, aromatic touch |
| Peonies | Yes with barrier | Full, bold blooms for drama |
| Baby’s Breath | No (toxic) | Only safe with florist tape + stem wrap |
To keep your cake safe:
- Always choose organic, pesticide-free flowers
- Use a barrier between the flower stems and cake (like floral tape, straws, or flower spikes)
- Never insert stems directly into the cake without protection
Learn more about safe floral styling with this decorating guide:
Check out: Flowers on Naked Cake Safe & Elegant Decorating Guide
Using Fresh Fruit, Herbs, and Sugar Dusting
Not into florals? Or want to add another layer of beauty and flavor? Naked cake wedding are incredibly versatile when it comes to other natural décor elements. Fresh fruit, herbs, and a sprinkle of powdered sugar can create an enchanting look.
Here are some options that work beautifully with most flavor profiles:
Fresh Fruit
- Strawberries, raspberries, and blueberries – great for bright, juicy contrast
- Figs and grapes – perfect for a moody, elegant fall or vineyard wedding
- Citrus slices – ideal for warm-weather weddings
Herbs
- Rosemary or thyme sprigs – create a sophisticated, green accent
- Mint leaves – great for summer cakes with fruity or chocolate flavors
Sugar Dusting
- A light powdered sugar sprinkle can add a snowy effect, enhance contrast, or highlight fresh ingredients on top of the cake.
Looking for ideas beyond the basics? Discover rustic cake variations here:
Don’t miss our guide on Naked Cakes Styles
These decorative elements bring your naked cake wedding design to life while enhancing flavor, texture, and visual impact. And the best part? They often cost less than fondant or elaborate sugar work, keeping your budget in check.
Choosing the Right Size and Tiers
Calculating Servings for Wedding Guests
Selecting the right size for your naked cake wedding isn’t just about looks it’s about making sure everyone gets a slice. Naked cake wedding, with their airy structure and minimal frosting, tend to be denser and taller in layers, but often provide fewer servings per tier compared to traditional frosted cakes.
To calculate the size you need:
- 50–75 guests: 2 tiers (6″ and 9″)
- 75–100 guests: 3 tiers (6″, 9″, 12″)
- 100–150 guests: 4 tiers (6″, 8″, 10″, 12″)
- 150+ guests: 5 tiers or sheet cake backups
Use this quick tier guide to plan:
| Number of Tiers | Servings | Ideal For |
|---|---|---|
| 2 tiers | 50–75 | Intimate or small weddings |
| 3 tiers | 75–100 | Mid-size weddings |
| 4 tiers | 100–150 | Large traditional weddings |
| 5 tiers | 150+ | Grand events or cake-as-centerpiece |
Remember, cake height varies by baker so always confirm tier height (most are 4–6 inches per layer).
Want to simplify your serving plan? Consider:
- Serving a smaller display cake + sheet cakes in the back
- Making only one or two tiers real and keeping the rest as decorated dummies
Single-Tier vs Multi-Tier Naked Cake wedding Designs
The beauty of a naked cake wedding is how versatile the design can be. From a simple one-tier cake for an elopement to a towering showstopper for 200 guests there’s no limit.
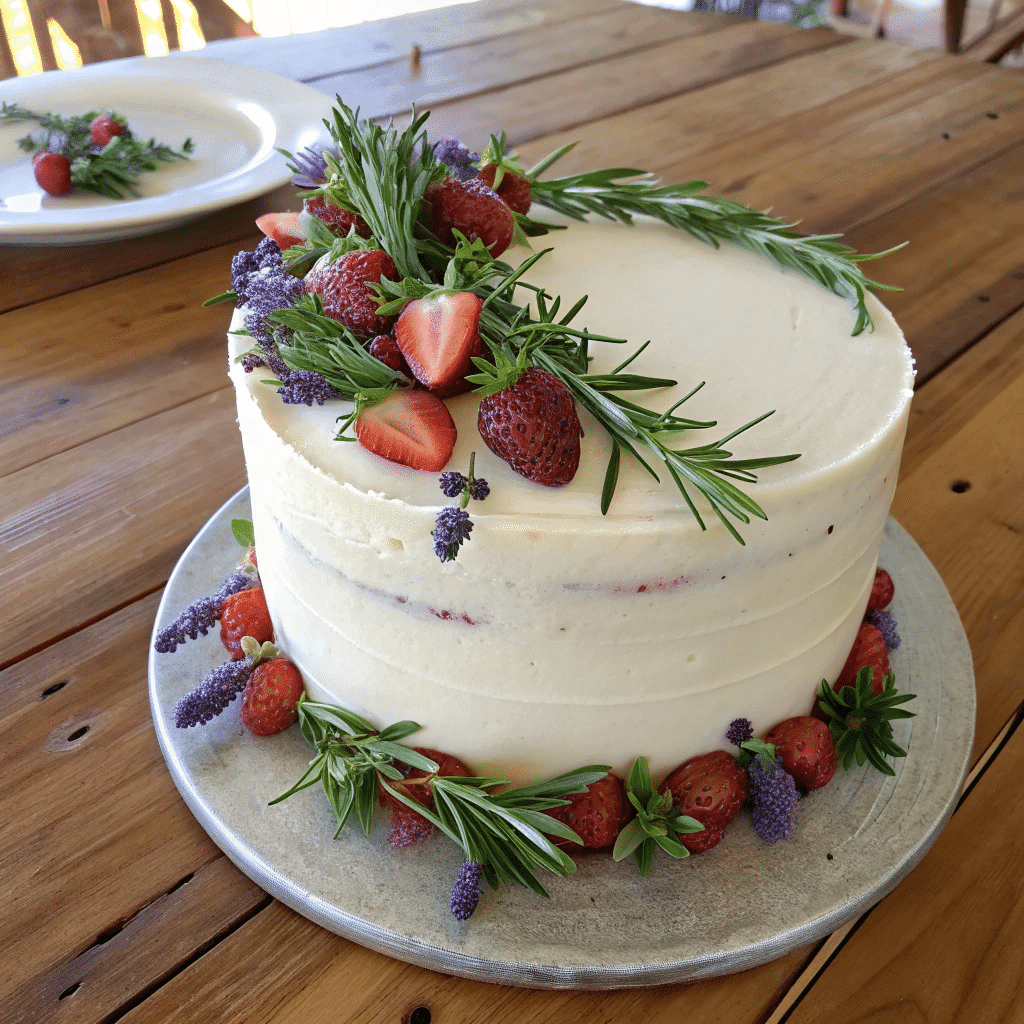
Single-Tier Naked Cake wedding
- Perfect for micro weddings or backyard celebrations
- Often decorated with lush florals or fruit to elevate the look
- Can double as both dessert and centerpiece
Multi-Tier Naked Cake wedding
- Adds height and grandeur
- More space to experiment with decorations per layer
- Allows mixing multiple flavors in one cake (e.g., chocolate base tier, vanilla top tier)
Looking for inspiration for tall cakes with minimal décor? Check out:
Discover the beauty of clean-layered cakes here
The number of tiers should reflect both your guest count and your wedding’s aesthetic. Naked cakes are visually dramatic without being fussy so even the simplest tiered version can make a big impact.
Budgeting for a Naked Cake Wedding
Cost Comparisons with Traditional Cakes
If you’re planning a wedding in the US, budgeting is a big part of the process—and your cake is no exception. While many assume a naked cake wedding is cheaper due to the lack of outer frosting or fondant, the truth is a bit more nuanced.
Let’s break down the average cost comparison:
| Cake Type | Average Cost per Slice | Notes |
|---|---|---|
| Fondant-covered | $6–$12 | More labor and material-intensive |
| Buttercream-finished | $4–$8 | Mid-range option |
| Naked Cake | $4–$10 | Savings on décor but higher labor due to fresh elements |
While a naked cake wedding may require fewer materials, they require precision, especially because there’s no frosting to hide flaws. Bakers often need to spend more time stacking and smoothing the exposed layers for a clean look.
Bonus tip: The location and reputation of your baker can also greatly influence cost.
Don’t miss this creative breakdown of how to elevate simple cakes affordably:
Explore: How to Make Chocolate Chip Cookies Without White Sugar
Tips to Save Money Without Losing Elegance
You can still achieve the stunning look of a naked cake wedding on a budget. Here are proven tips to cut costs without cutting style:
1. Limit the Tiers
Go for two tiers for display and serve sheet cake in the back for guests. They won’t know the difference, and you’ll cut costs by up to 40%.
2. Choose In-Season Fruits and Flowers
Using strawberries in February or figs in July? That’s going to cost you. Stick to in-season items for affordable and fresher decoration.
3. DIY Cake Topper
Create your own cake topper using wood, paper, or florals. Personalized toppers from Etsy or craft stores are usually under $20.
4. Use Edible Flowers from Your Garden
If they’re organic and pesticide-free, homegrown flowers like violets or nasturtiums can look stunning and save you money.
5. Go Naked But Add Elegance
Opt for a semi-naked finish to help preserve the cake while keeping the rustic vibe. It’s often easier for bakers and keeps costs balanced.
Check out this creative yet budget-friendly twist on strawberry cake design:
Looking for inspiration? Try this strawberry shortcake guide
Remember: A naked cake wedding isn’t just a money-saving hack it’s a design choice that adds charm, style, and authenticity to your wedding day.
DIY vs Hiring a Pro for Your Naked Cake wedding
Pros and Cons of Making Your Own Wedding Cake
With the rise of baking shows and DIY culture, more couples are considering making their own naked cake wedding masterpiece. But is it worth the risk?
Let’s weigh the pros and cons of baking your wedding cake yourself:
| DIY Naked Cake | Pros | Cons |
|---|---|---|
| Cost | Save money on labor and design | May require new tools or multiple trials |
| Personal Touch | Completely personalized | Added pressure and time commitment |
| Schedule | Bake on your own timeline | Risk of last-minute disasters |
| Storage | Control over ingredients and freshness | Requires cold storage space on-site |
Best For: Intimate weddings, experienced home bakers, or couples on a tight budget.
Caution: Remember that naked cakes are fragile. With minimal frosting, they dry out faster, and uneven stacking can ruin presentation. If you’re baking in a warm climate or traveling with your cake, be ready for added challenges.
Discover great ideas like baking shortcake without stress:
Don’t miss our beginner-friendly shortcake recipe
How to Choose the Right Cake Designer
If the idea of baking on your wedding week feels overwhelming (it should), hiring a pro is the smart move. Here’s how to select the right baker for your naked cake wedding:
1. Ask for a Naked Cake wedding Portfolio
Not every baker excels at the naked look. Ask for photos of previous naked cake wedding they should have clean lines, even layers, and fresh decorations.
2. Schedule a Tasting
Never skip the taste test. Evaluate flavors, fillings, and freshness before committing.
3. Check Their Decoration Knowledge
Ask if they use food-safe flowers, fresh fruit, and how they handle exposed layers. A skilled baker knows the importance of edible décor and food-safe practices.
4. Inquire About Setup
Some bakers deliver and set up the cake, while others may drop it off. For a naked cake wedding, proper stacking and final décor on-site are crucial make sure they offer that service.
5. Read Reviews
Look for testimonials that mention reliability, communication, and how the cake held up on the big day.
Looking for rustic elegance inspiration? Check out one of our most charming cake features:
Explore Naked Wedding Cake Design Ideas
A professional baker can bring your vision to life with confidence leaving you stress-free and cake-happy on your wedding day.
Common Naked Cake wedding Mistakes to Avoid
Moisture, Stability, and Presentation Concerns
While a naked cake wedding is undeniably beautiful, this minimalist style requires special care to avoid common (and often costly) mistakes. With no frosting to hide imperfections or hold everything in place, you’ll need to plan every detail with precision.
Mistake #1: Letting the Cake Dry Out
Without full frosting, naked cakes are vulnerable to drying out quickly. To avoid this:
- Bake as close to the wedding as possible
- Store in a sealed container until assembly
- Use moisture-locking fillings like jams, curds, or stabilized whipped creams
Mistake #2: Weak Structure
Since frosting doesn’t support the structure, a naked cake wedding needs strong internal support, especially with multiple tiers.
- Insert dowels or cake boards between tiers
- Stack layers only after they’re fully cooled and chilled
Mistake #3: Over-Decorating
Less is more with a naked cake wedding. Overloading it with heavy fruit, florals, or dripping sauces can cause collapse or mess.
- Balance is key keep layers even and toppings light
- Test any drizzles (caramel, chocolate) in advance to ensure they don’t melt or run too much
Mistake #4: Exposing Unsafe Flowers
This is a health risk many overlook. Some beautiful flowers like baby’s breath or lilies are toxic or pesticide-treated.
- Only use organic, food-safe flowers
- Wrap stems with floral tape or straws to prevent contact with cake
Need guidance on choosing safe cake décor? Check this expert floral decorating guide:
Discover safe decorating options for naked cakes
How to Ensure a Flawless Finish
Avoid the stress and regrets by following these expert-approved tips:
Keep It Cool
Naked cake wedding melt and slide easily especially if they include fresh cream or fruit. Make sure:
- Venue has refrigeration or cool storage
- Cake is assembled on-site, not transported fully stacked
Use a Cake Collar (for DIY Bakers)
To get those crisp edges and perfect layers, use a transparent acetate collar during assembly. It helps:
- Maintain shape while stacking
- Keep fillings even and smooth
Transport Carefully
If you’re delivering the cake yourself:
- Chill it overnight so it’s firm during transport
- Place it in a level, non-slip box or cooler
- Drive slowly and avoid turns or hills
Want inspiration on how clean finishes and simple styling come together?
Check out rustic cake designs with visual appeal
Naked cakes may look simple, but executing them well takes finesse. Avoid these mistakes and you’ll get a cake that’s as perfect as your big day.
Real Wedding Inspiration with Naked Cake wedding
Inspiring Naked Cake Wedding Examples
A picture’s worth a thousand words, and when it comes to your wedding cake, a little inspiration can spark major creativity. Naked cakes are incredibly adaptable from boho and beach weddings to upscale vineyard receptions.
Here are a few real-world styling ideas that show how diverse and elegant a naked cake wedding can truly be:
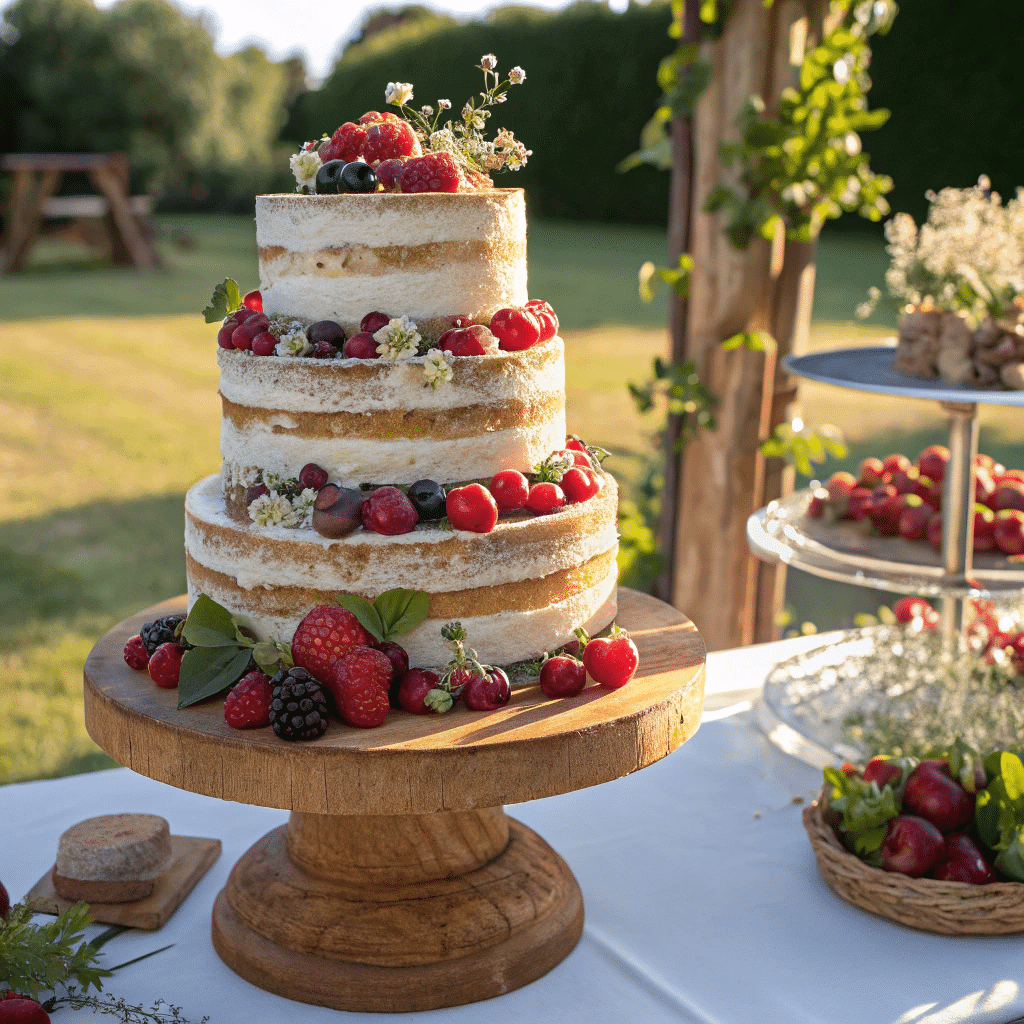
1. Rustic Barn Wedding
- A three-tier vanilla sponge with mixed berries and rosemary sprigs
- Finished with powdered sugar and burlap ribbon
- Displayed on a wood slab stand under string lights
2. Elegant Garden Wedding
- Semi-naked lemon cake with lavender buttercream
- Decorated with fresh lavender, white roses, and figs
- Paired with eucalyptus garland down the dessert table
3. Coastal Beach Ceremony
- Coconut sponge with mango-pineapple filling
- Topped with tropical flowers (hibiscus, plumeria) and edible gold leaf
- Simple two-tier cake displayed on rattan basket stand
4. Fall Vineyard Wedding
- Chocolate spice cake with apple butter filling
- Decorated with figs, grapes, and burnt orange flowers
- Paired with rustic décor: wine barrels and autumn leaves
These themes prove that naked cakes don’t just fit one aesthetic they elevate the entire atmosphere of your naked cake wedding, no matter your style.
Want more ideas from real brides and rustic weddings? Don’t miss our favorite naked cake wedding features:
Explore our naked wedding cake gallery
Best Setups for Display at naked cake Wedding Venues
Your naked cake wedding deserves to be shown off in a spot that makes jaws drop. Since these cakes are naturally beautiful, placement and presentation are key.
Here’s how to make it shine:
1. Elevate Your Cake
- Use wooden slabs, vintage crates, or marble stands
- Multi-height pedestals for cupcakes or sheet cakes on the side
2. Add Backdrops
- Floral arches, macrame panels, or hanging greenery make the cake table pop
- Use chalkboards for a custom cake flavor sign
3. Keep It Natural
- Surround with loose greenery, linen napkins, or romantic candlelight
- Stick with earth tones or soft pastels for harmony
Pro Tip: Display your cake in a shaded, temperature-controlled space especially for outdoor weddings.
Looking for more unique food presentation ideas? Try this beginner-friendly approach:
Don’t miss our guide to creating standout recipes
Conclusion:
A naked cake wedding blends rustic charm with elegant simplicity. With endless flavor possibilities, creative decoration options, and flexible design styles, these cakes deliver beauty and taste in one unforgettable package. Whether you DIY or go pro, a naked cake wedding is a timeless choice for modern couples who love authenticity.
Ready to design your dream cake?
Looking for inspiration? Try this floral decorating guide
Frequently Asked Questions About Naked Cake Wedding
What is a naked wedding cake?
A naked wedding cake is a cake with little to no outer frosting, allowing the sponge layers and fillings to remain visible. It’s popular for its rustic, organic look and often decorated with fresh flowers, fruit, or herbs. Perfect for couples who want a minimalist and natural aesthetic.
How do I decorate a naked cake for a wedding?
Decorating a naked cake wedding involves layering with buttercream or ganache between tiers, then topping with fresh or edible flowers, seasonal fruits, and herbs. Always ensure decorations are food-safe. A sprinkle of powdered sugar or a drizzle of caramel adds elegance without overdoing it.
What flavors work best for a naked cake wedding?
Flavors that retain moisture and offer contrast between layers work best. Popular choices include vanilla bean with lemon curd, chocolate with espresso, red velvet with raspberry jam, and almond with berry compote. Seasonal flavors like pumpkin spice or coconut mango are also fantastic.
Are naked cakes cheaper than traditional wedding cakes?
Not always. While naked cakes require less frosting, they demand high precision and quality ingredients, which can even out costs. On average, naked cakes range from $4–$10 per slice, depending on size, décor, and location.
Can I use fresh flowers on a naked cake wedding?
Yes, but they must be organic and pesticide-free. Use barriers like floral tape or straws to prevent stems from touching the cake. Popular safe options include roses, pansies, and lavender. Avoid toxic blooms like baby’s breath or lilies unless properly treated.
How far in advance can you make a naked cake wedding?
Due to the lack of outer frosting, naked cakes dry out faster. It’s best to bake and fill them no more than 24–48 hours before the event. Keep them refrigerated until the last few hours, then allow time to come to room temperature before serving.